G7 Ukulele Chord: Finger Placement and the Neighbouring Strings
G7 looks crowded because three fingers sit close together. In G–C–E–A tuning the numbers, string 4 to string 1, are 0–2–1–2: the G string is open, the C string is held at fret 2, the E string at fret 1 and the A string at fret 2.
The shape
One comfortable choice is the index finger on E, fret 1, the middle finger on C, fret 2, and the ring finger on A, fret 2. This is the same suggestion as in our first-chord guide. If another fingering makes each string clear and helps the next change, use it.
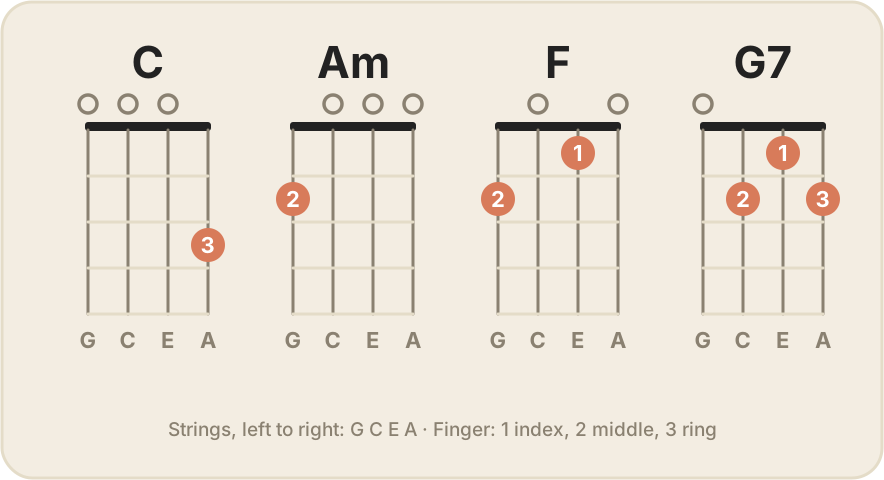
Build it slowly
- Place the middle finger on the C string, fret 2.
- Add the ring finger on the A string, fret 2.
- Add the index finger on the E string, fret 1.
- Pluck the four strings one at a time.
- Lift all three fingers and build the shape again.
Check the neighbouring strings
- The open G string must ring. If it is dull, a finger or its side is touching it. Arch the fingers.
- The E string lies between the strings your middle and ring fingers hold. Keep those two fingers arched so that they do not rest on the E string where the index finger holds it.
- Fingertips just behind the frets, as with any chord. If the C or A string buzzes, check how close each tip is to the fret wire.
If one string is dull, find it string by string before you press harder.
A short loop with C
Play C | G7 | C | G7, one bar each, with one strum on beat 1 of each bar. Use beats 2, 3 and 4 to prepare the next shape. Keep the tempo slow enough that G7 is clear every time. When that is steady, follow the steps in how to change chords without stopping the beat.
Want to repeat a short loop at a slow tempo? Get Uku and explore its practice features under the app’s trial and unlock terms.